Top APK for STUDENTS

App #1: SelfControl

Imagine you are studying, you sit at your desk and start to create a mind map to organize your ideas. When you’ve just created your first node on your Mind Map, you get a notification on Facebook. It’s almost impossible to ignore! So you check it out and waste another few minutes instead of studying!
To avoid distractions like this, SelfControl allows you to block certain websites for a set amount of time. This enables you to concentrate fully on your studies and avoid sporadically checking social networks or your email. Best of all is that once you put these blocks in place, it’s impossible for you to access them until the time you’ve previously specified runs out. You can’t just flick a switch and check them. Even if you get desperate and delete the application, you won’t be able to access them before the time you specified. Happy studying!

apps for students
   apple icon


App#2: Maths Alarm Clock

Maths Alarm Clock is another tool for self-control. This time, however, for your dreams! If you are a student who suffers from continuously hitting the snooze button in the morning, then this is the app for you. Maths Alarm Clock makes you solve a simple math problem in order to turn your alarm off.
The benefits of this are twofold:
1. No more snoozing and being late for class
2. Having to solve a math problem in the morning gets your brain working quicker. This puts you in a better position when it comes to learning throughout the day
apple icon
   android icon

App #3: Sleep If U Can

If mathematical problems are not enough to get you out of bed, we bring you an even more extreme solution. With Sleep If U Can, you’ll have to get out of bed and take a picture of your sink (or any other area you define) to turn off the alarm!
Watch this video to see how Sleep If U Can will make you get out of your bed:
apple icon
   android icon

App #4: The Oxford Dictionary

Your lecturer smugly says a word they assume you all know the meaning of. You don’t. That is why theOxford Dictionary app is a must for students, no matter what subject you are studying. If you can’t find a word in there then your lecturer is making them up…which happens quite often actually.
apps for students
      apple icon
   android icon

App #5: Babylon

Finding a good app to help you learn a new language can be hard. This app is a serious contender though. Babylon is an excellent online translator for more than 75 languages. Using this app you can solve any problems you are having with key vocabulary for your exams. Check out our Flashcard tool which is perfect for keeping track of all the vocabulary you need to know to master a new language.
apps for students
     apple icon
   android icon

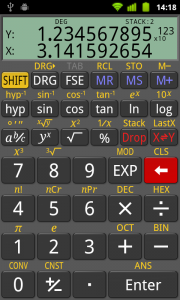
App #6: RealCalc Scientific Calculator

Have you left your calculator at home? How can you solve all those tricky equations and cube roots now? RealCalc Scientific Calculator is the answer. This app is perfect for students who need all the functionality of a scientific calculator. This student app is ideal for mathematical or scientific problems so if this is your area, then this is the app for you!

apps for students
   android icon

scientific calculator

App #7: JumpCut

Yes, we know that you use the copy and paste buttons more than you should when writing class essays. Still, we all know that this can save a whole bunch of time. Simply tweak the text a little, add some of your own work and the job is done! If this modus operandi sounds familiar to you then JumpCut will save you a lot of time! Jumpcat gives you access to text you’ve copied and pasted before, even if you copied new text to your clipboard since then. This is a handy time saver and is ideal for students with a looming deadline!

apps for students
   apple icon

App #8: TED

The people we surround ourselves with have a great influence on how we think and behave. So why not surround yourself with some of the world’s most fascinating people? Educators, radical technology geniuses, medical mavericks, business experts and legends of music, TED has it all. Enjoy the best conferences in the world with this educational app that will open your mind.
apps for students
     apple icon
   android icon

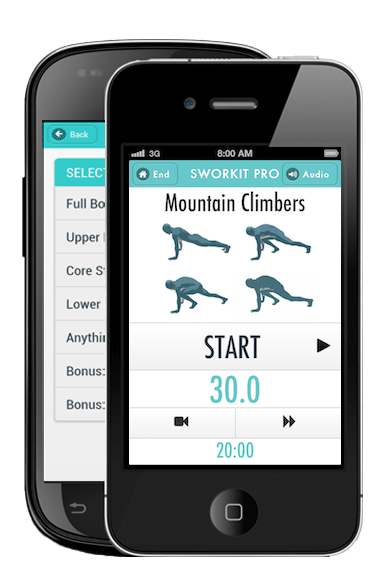
App #9: Sworkit

Classes and study occupy most of a student’s day so it may be the case that you’re neglecting exercise. Sworkit allows you to create training plans in 5 minutes. So now you have no excuse for your lack of exercise, five minutes is all you need!
apps for students
     apple icon
   android icon

Sworkit student app

App #10: Circle of 6

Safety is important. No one should ever have to alter the lifestyle they want to lead because they fear for their safety. There are some simple things you can do that can go a long way to ensuring you’re safety. If you’re coming home alone or walking around campus, the Circle of 6 app will make you feel safer. Circle of 6 does this by continuously connecting you with 6 contacts of your choice. The app has a default message ready to be sent along with your location at any time. It’s direct, fast and secure. Hopefully, you will never have to use it but there might be a time when it could keep you safe!
apps for students
     apple icon
   android icon

App #11: Angry words


A classic. This app has become one of the most popular apps worldwide. Angry words is a multi-player Scrabble-type game that allows you to exercise your mind while having a good time. This app is a great way to kill time when you’re waiting for your bus (or you could check your study notes on ExamTime!).

Single Gurkha Soldier Saves Girl from Rape and Takes on 40 Train Robbers

Bishnu Shrestha, who had just retired from the Indian army where he served as a Gorkha soldier, held off a horde of robbers that tried to rob a train in India. From the article on Republica:

“The band of about 40 robbers, some of whom were travelling as passengers, stopped the train in the Chittaranjan jungles in West Bengal around midnight. Shrestha– who had boarded the train at Ranchi in Jharkhand, the place of his posting–was in seat no. 47 in coach AC3.

“They started snatching jewelry, cell phones, cash, laptops and other belongings from the passengers,” Shrestha recalled. The soldier had somehow remained a silent spectator amidst the melee, but not for long. He had had enough when the robbers stripped an 18-year-old girl sitting next to him and tried to rape her right in front of her parents. He then took out his khukuri and took on the robbers.
“The girl cried for help, saying ´You are a soldier, please save a sister´,” Shrestha recalled. “I prevented her from being raped, thinking of her as my own sister,” he added. He took one of the robbers under control and then started to attack the others. He said the rest of the robbers fled after he killed three of them with his khukuri and injured eight others…“Fighting the enemy in battle is my duty as a soldier; taking on the dacoits in the train was my duty as a human being,” said the Indian army nayak.
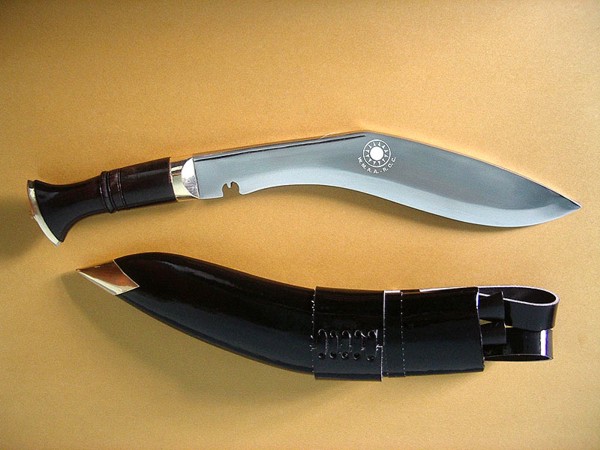
Essentially, one man took on 40 armed thieves with only a khukuri. What is a khukuri?

Gurkha receives bravery medal from the Queen Elizabeth

A Gurkha soldier who single-handedly defeated more than 30 Taliban fighters has been awarded the Conspicuous Gallantry Cross by the Queen.
Corporal Dipprasad Pun, 31, described how he was spurred on by the belief that he was going to die and so had nothing to lose in taking on the attackers who overran his checkpoint in Afghanistan.
His gallantry award is second only to the Victoria Cross - the highest honour for bravery in the face of the enemy.
Proud: Queen Elizabeth presents the 31-year-old Gurkha with his medal at Buckingham Palace during an Investiture Ceremony
Cpl Pun, from the 1st Battalion the Royal Gurkha Rifles, was presented with the CGC during an investiture ceremony at Buckingham Palace, during which a number of other soldiers were recognised for their bravery.
Speaking after receiving the honour from the Queen, the Gurkha said: 'I'm very excited and happy to here in the Palace to receive the Conspicuous Gallantry Cross. This will be a great memory for the future.'
The soldier fired more than 400 rounds, launched 17 grenades and detonated a mine to thwart the Taliban assault on his checkpoint near Babaji in Helmand Province, southern Afghanistan, last September.
At one point, after exhausting all his ammunition, he had to use the tripod of his machine gun to beat away a militant who was climbing the walls of the compound.

After the ceremony, Cpl Pun was congratulated by investiture guests who queued up to shake his hand.
Speaking about the actions which earned him the CGC, he said: 'At that time I wasn't worried, there wasn't any choice but to fight. The Taliban were all around the checkpoint, I was alone.
'I had so many of them around me that I thought I was definitely going to die so I thought I'd kill as many of them as I could before they killed me.
Decorated: Sergeant Dipprasad Pun, 31, of the 1st Battalion the Royal Gurkha Rifles holds his Conspicuous Gallantry Cross
'That incident happened in the middle of my tour and after that I thought nobody can kill us now - when we met the enemy I wasn't scared.
'I thought the Taliban did not have the capacity to fight with us.'
Cpl Pun, an acting sergeant during his Afghan deployment, was on sentry duty at the time of the attack when he heard a clinking noise outside the small base.
At first he thought it might be a donkey or a cow, but when he went to investigate he found two insurgents digging a trench to lay an improvised explosive device (IED) at the checkpoint's front gate.
He realised that he was completely surrounded and that the Taliban were about to launch a well-planned attempt to overrun the compound.
The enemy opened fire from all sides, destroying the sentry position where the soldier had been on duty minutes before.
Defending the base from the roof, the Gurkha remained under continuous attack from rocket-propelled grenades and AK47s for more than a quarter of an hour.
Most of the militants were about 50ft away from him, but at one point he turned around to see a 'huge' Taliban fighter looming over him.
The soldier picked up his machine gun and fired a long burst at the man until he fell off the roof.
Hero: Sergeant Dipprasad Pun defeated more 30 Taliban attackers single-handedly
When another insurgent tried to climb up to his position, the Gurkha attempted to shoot him with his SA80 rifle. But it did not work, either because it had jammed or because the magazine was empty.
He first grabbed a sandbag but it had not been tied up and the contents fell to the floor.
Then he seized the metal tripod of his machine gun and threw it at the approaching Taliban militant, shouting in Nepali 'Marchu talai' ('I will kill you') and knocking him down.
Two insurgents were still attacking by the time the heroic Gurkha had used up all his ammunition, but he set off a Claymore mine to repel them.
At this point his company commander, Major Shaun Chandler, arrived at the checkpoint, slapped him on the back and asked if he was OK.
In total he fired off 250 general purpose machine gun rounds, 180 SA80 rounds, six phosphorous grenades, six normal grenades, five underslung grenade launcher rounds and one Claymore mine.
The only weapon he did not use was the traditional Kukri knife carried by Gurkhas because he did not have his with him at the time.
The married soldier, whose father and grandfather were also Gurkhas, is originally from the village of Bima in western Nepal but now lives in Ashford, Kent.
His medal citation said he saved the lives of three comrades at the checkpoint at that time and prevented the position being overrun.
It read: 'Pun could never know how many enemies were attempting to overcome his position, but he sought them out from all angles despite the danger, consistently moving towards them to reach the best position of attack.'
Major General Nicholas Carter, who was commander of combined forces, including British troops, in southern Afghanistan during Cpl Pun's deployment, praised the soldier and those from the Mercian Regiment receiving gallantry awards today.
The senior officer, who received the Distinguished Service Order from the Queen for his leadership in the Middle East country, said: 'Their efforts have been tremendous. It was a privilege to have members of the 1st Battalion Royal Gurkha Rifles and the Mercian Regiment under my command.
'The Conspicuous Gallantry Cross does not get handed out lightly, it was a most remarkable achievement by that particular young Gurkha.'

UNDERSTANDING THE Grease

Since lubricating oil can oxidize, so can the base oil in grease. When the grease oxidizes, it usually darkens; there is a build-up of acidic oxidation products, just as in other lubrications. These products can have a destructive effect on the thickener, causing softening, oil bleeding, and leakage. Because grease does not conduct heat easily, serious oxidation can begin at a hot point and spread slowly through the grease. This produces carbonization and progressive hardening or crust formation. All things considered the effect of oxidation is more harmful in grease than in oil.
The rate of oxidation is mainly dependent on the temperature. Here it is good to understand that if a soap-based grease is heated, its penetration increases only very slowly until a certain critical temperature is reached. At this point the gel structure breaks down, and the whole grease becomes liquid. This critical temperature is called the DROP POINT.
Grease, when heated above its drop point and then allowed to cool it usually does not fully regain its grease-like consistency, and its performance subsequently will be unsatisfactory. Therefore, it follows that at no time should the drop point be exceeded. The problem with multi-purpose greases is that at least one of the agents will exceed its drop point thus adversely affecting the soaponification process. Grease has a maximum temperature at which it can safely be used. Therefore, it follows that it must also have a minimum temperature. This minimum temperature is the point where the grease becomes too hard for the bearing, or other greased component, to be used. Again, the base oil of the grease determines the minimum temperature. Obviously, the base oil of the grease for low-temperature service must be made from oils having a low viscosity at that temperature.
The temperature limits for use of greases are therefore, determined by drop point, oxidation, and stiffening at low temperatures.
Grease can be divided into 6 general categories or types; i.e., mixtures of mineral oils and solid materials, heavy, asphaltic-type oils blended with lighter oils, extreme-pressure greases, roll-neck greases, soap-thickened mineral oils and multi-purpose grease.
MINERAL OILS MIXED WITH SOLIDS
These types of greases are very heavy lubricants for specialized applications. Such greases lubricate rough-fitting machine parts operating under heavy pressures or loads at relatively slow speeds. Examples of equipment that will typically use this type of grease include concrete mixers, bearings and rollers on conveyors and heavy construction equipment.
HEAVY ASPHALTIC-TYPE OILS BLENDED WITH LIGHTER OILS
These types of lubricants are classified as greases but are actually thick, heavy oils used to lubricate open-type gearing and wire rope. A primary advantage of these oils is that they form a heavy protective film when heated or painted on surfaces and then allowed to cool. Lighter oil is typically blended with the heavy oils in order to improve the pour point of the oil.
EXTREME-PRESSURE GREASES
The unique characteristic of this type of grease is that it contains additives to improve firm strength under various applications. In essence, film strength provides the resistance of the lubricant to being torn apart, thus preventing metal-to-metal contact of the equipment being lubricated. A film is formed by a chemical reaction of the metal to the additives in the grease. The chemical reaction is usually brought about (or accelerated) by pressure exerted on the grease, creating heat.

A few of the additives used in EP greases include compounds containing parts of chlorine, phosphorus, active and/or passive sulfur, chlorinated waxes and phosphates. Zinc and lead may also be added, as well as asbestos in some lubricants as a filler to cushion the shock loading on gear drives. The specific additive being used will always depend on the application for use. Factors to be considered for types of additives include specific equipment operating conditions such as load, speed, surface condition and inherent design characteristics.
ROLL NECK GREASES
Roll neck greases are specialized lubricants used almost exclusively for lubricating plain bearings in rolling equipment. For example, it’s fairly common to use a block of NLGI No. 6 grease, which has the consistency of a bar of soap, carved to mate with the shape needed to accommodate the bearing of heavily loaded equipment.
SOAP THICKED MINERAL OILS
This is by far the most widely used category of grease in industry today. This type of grease varies by the additive that forms the soap in the lubricants chemical makeup.
Sodium-base greases are also general-purpose greases. Because they have a higher dropping point (approximately 300o to 350ºF), they are often used to lubricate machine parts operating near heat. Sodium greases made with lighter oils are used for ball and roller bearing lubrications, as are combinations (mixed base) of calcium and sodium grease
Sodium-soap greases have a spongy or fibrous texture and are yellow or green in color. Because of their working stability and intermediate melting point, they are used for lubricating wheel bearings (other than disc brakes) and for general-purpose industrial applications. Typical examples include rough, heavy bearings operating at low speeds, as well as skids, track curves and heavy-duty conveyors.
Barium-soap greases are general-purpose types, valued for their ability to work over a wide temperature range. Their dropping point is approximately 350ºF or higher, although they are not intended to be used in continuous operation at temperatures above 275ºF.
Barium-soap greases are chosen for a variety of jobs, especially for nearly all types of bearing lubrications. They have a high-soap content. However, this makes this type of lubricant less suitable for use at low temperatures and in very high-speed applications. They have a buttery of fibrous texture and are reddish-yellow or green in color.
Lithium-soap grease handles extremes of temperature quite well, which makes them highly suitable for both high and low temperature application. They have a dropping point of approximately 350ºF, and can be used in continuous temperatures of 300ºF. One reason for their successful low-temperature performance is that they are made with oil having a low pour point. In fact, lithium-soap greases have been used successfully at temperatures of -60ºF. Use of a lithium-soap grease at higher temperatures requires a different formula, however, the same grease can't be used at both extremes of high and low temperatures because the change would be in the viscosity of the oil used in the grease.
Basically, lithium-soap greases have very good stability; good water resistance, and are also readily pumpable. They have a buttery texture and a brownish-red color.
Calcium-soap, also called lime-soap greases, are probably the best known and most often used of all greases. Depending on the method of manufacture they are usually relatively inexpensive. Uses include axle grease, water pump grease and general machinery applications.
Because its water content begins to dry out, and the soap and oil separate, calcium-soap grease isn’t suited to applications where the temperature will get above 160ºF.

The major advantage of calcium-soap grease is that they don’t dissolve in water. However, it is not suited to use in lubricating high-speed bearings. Ordinary general-purpose calcium-soap greases have a dropping point of approximately 175o to 200ºF.
Calcium-complex grease has unusually high heat resistance making it of considerable value in extreme-pressure applications. The dropping point of this type of grease is 500ºF or even higher. This means that this type of lubricant will maintain its stability while running continuously at high temperatures. However, this type of grease has not replaced lithium-soap greases because they are not as mechanically stable.
Calcium-soap greases are yellow or reddish in color, and have a smooth buttery texture.
Aluminum-soap greases are special-purpose lubricants. Their particular advantage is that they are very sticky making them perfect for applications requiring surface lubrication.
MULTI-PURPOSE GREASE
Multi-purpose greases combine the properties of two or more specialized greases. This permits the use of a single type of grease for a variety of applications. It is possible to replace as many as six specialized greases with single multi-purpose grease and get better results all at the same time. Most of the multi-purpose greases have a soap base of barium, lithium, or calcium complex. For example, the lithium-soap greases discussed earlier. They are not only water-resistant and corrosion inhibiting, but they have very good mechanical and oxidation stability as well.
By reducing the number of lubricants, which a company keeps in stock, the lubricator's job becomes much easier. Another advantage is that it helps reduce the chances of error in application.
Good multi-purpose lubricating grease has to perform well in a number of applications. It should have a high melting point, and operate well at continuous temperatures of 250ºF or more. Such grease should also have good resistance to water, and exceptional stability.
SUMMARY
Of the numerous applications for grease, most are for lubricating bearings of various types. Bearings fall into two main categories; i.e., plain or anti friction. In addition, these types of lubricants are often used for the lubrication of ways and guides.
As a general rule, grease used for lubricating ways and slides are sodium-base greases. Plain bearings on the other hand use grease for limited speeds, typically below 300 RPM with a practical maximum of about 400 RPM. On the other hand, greases for anti-friction (high-speed) bearings include those used for plain bearings with the exception of barium greases. Barium should never be used for high-speed applications.
Extreme pressure greases are commonly used in heavy-duty ball and roller bearings, as well as plain bearing applications that are subjected to high-loading conditions. A gear set is a perfect example where EP grease is used to overcome high-load conditions. However, operating temperatures are typically limited to a range of 150o to 200ºF for this type of lubricate

Drawing and Sketch

Introduction

One of the best ways to communicate one's ideas is through some form of picture or drawing. This is especially true for the engineer. The purpose of this guide is to give you the basics of engineering sketching and drawing.
We will treat "sketching" and "drawing" as one. "Sketching" generally means freehand drawing. "Drawing" usually means using drawing instruments, from compasses to computers to bring precision to the drawings.
This is just an introduction. Don't worry about understanding every detail right now - just get a general feel for the language of graphics.
We hope you like the object in Figure 1, because you'll be seeing a lot of it. Before we get started on any technical drawings, let's get a good look at this strange block from several angles.
Figure 1 - A Machined Block

Isometric Drawing

The representation of the object in figure 2 is called an isometric drawing. This is one of a family of three-dimensional views called pictorial drawings. In an isometric drawing, the object's vertical lines are drawn vertically, and the horizontal lines in the width and depth planes are shown at 30 degrees to the horizontal. When drawn under these guidelines, the lines parallel to these three axes are at their true (scale) lengths. Lines that are not parallel to these axes will not be of their true length.
Figure 2 - An Isometric Drawing

Any engineering drawing should show everything: a complete understanding of the object should be possible from the drawing. If the isometric drawing can show all details and all dimensions on one drawing, it is ideal. One can pack a great deal of information into an isometric drawing. However, if the object in figure 2 had a hole on the back side, it would not be visible using a single isometric drawing. In order to get a more complete view of the object, an orthographic projection may be used.

Orthographic or Multiview Drawing

Imagine that you have an object suspended by transparent threads inside a glass box, as in figure 3.
Figure 3 - The block suspended in a glass box

Then draw the object on each of three faces as seen from that direction. Unfold the box (figure 4) and you have the three views. We call this an "orthographic" or "multiview" drawing.
Figure 4 - The creation of an orthographic multiview drawing

Figure 5 shows how the three views appear on a piece of paper after unfolding the box.
Figure 5 - A multiview drawing and its explanation

Which views should one choose for a multiview drawing? The views that reveal every detail about the object. Three views are not always necessary; we need only as many views as are required to describe the object fully. For example, some objects need only two views, while others need four. The circular object in figure 6 requires only two views.
Figure 6 - An object needing only two orthogonal views

Dimensioning

Figure 7 - An isometric view with dimensions

We have "dimensioned" the object in the isometric drawing in figure 7. As a general guideline to dimensioning, try to think that you would make an object and dimension it in the most useful way. Put in exactly as many dimensions as are necessary for the craftsperson to make it -no more, no less. Do not put in redundant dimensions. Not only will these clutter the drawing, but if "tolerances" or accuracy levels have been included, the redundant dimensions often lead to conflicts when the tolerance allowances can be added in different ways.
Repeatedly measuring from one point to another will lead to inaccuracies. It is often better to measure from one end to various points. This gives the dimensions a reference standard. It is helpful to choose the placement of the dimension in the order in which a machinist would create the part. This convention may take some experience.

Sectioning

There are many times when the interior details of an object cannot be seen from the outside (figure 8).
Figure 8 - An isometric drawing that does not show all details

We can get around this by pretending to cut the object on a plane and showing the "sectional view". The sectional view is applicable to objects like engine blocks, where the interior details are intricate and would be very difficult to understand through the use of "hidden" lines (hidden lines are, by convention, dotted) on an orthographic or isometric drawing.
Imagine slicing the object in the middle (figure 9):
Figure 9 - "Sectioning" an object

Figure 10 - Sectioning the object in figure 8

Take away the front half (figure 10) and what you have is a full section view (figure 11).
Figure 11 - Sectioned isometric and orthogonal views

The cross-section looks like figure 11 when it is viewed from straight ahead.

Drawing Tools

To prepare a drawing, one can use manual drafting instruments (figure 12) or computer-aided drafting or design, or CAD. The basic drawing standards and conventions are the same regardless of what design tool you use to make the drawings. In learning drafting, we will approach it from the perspective of manual drafting. If the drawing is made without either instruments or CAD, it is called a freehand sketch.
Figure 12 - Drawing Tools

"Assembly" Drawings

An isometric view of an "assembled" pillow-block bearing system is shown in figure 13. It corresponds closely to what you actually see when viewing the object from a particular angle. We cannot tell what the inside of the part looks like from this view.
We can also show isometric views of the pillow-block being taken apart or "disassembled" (figure 14). This allows you to see the inner components of the bearing system. Isometric drawings can show overall arrangement clearly, but not the details and the dimensions.
Figure 13 - Pillow-block (Freehand sketch)

Figure 14 - Disassembled Pillow-block

Cross-Sectional Views

A cross-sectional view portrays a cut-away portion of the object and is another way to show hidden components in a device.
Imagine a plane that cuts vertically through the center of the pillow block as shown in figure 15. Then imagine removing the material from the front of this plane, as shown in figure 16.
Figure 15 - Pillow BlockFigure 16 - Pillow Block

This is how the remaining rear section would look. Diagonal lines (cross-hatches) show regions where materials have been cut by the cutting plane.
Figure 17 - Section "A-A"

This cross-sectional view (section A-A, figure 17), one that is orthogonal to the viewing direction, shows the relationships of lengths and diameters better. These drawings are easier to make than isometric drawings. Seasoned engineers can interpret orthogonal drawings without needing an isometric drawing, but this takes a bit of practice.
The top "outside" view of the bearing is shown in figure 18. It is an orthogonal (perpendicular) projection. Notice the direction of the arrows for the "A-A" cutting plane.
Figure 18 - The top "outside" view of the bearing

Half-Sections

A half-section is a view of an object showing one-half of the view in section, as in figure 19 and 20.
Figure 19 - Full and sectioned isometric views

Figure 20 - Front view and half section

The diagonal lines on the section drawing are used to indicate the area that has been theoretically cut. These lines are called section lining or cross-hatching. The lines are thin and are usually drawn at a 45-degree angle to the major outline of the object. The spacing between lines should be uniform.
A second, rarer, use of cross-hatching is to indicate the material of the object. One form of cross-hatching may be used for cast iron, another for bronze, and so forth. More usually, the type of material is indicated elsewhere on the drawing, making the use of different types of cross-hatching unnecessary.
Figure 21 - Half section without hidden lines

Usually hidden (dotted) lines are not used on the cross-section unless they are needed for dimensioning purposes. Also, some hidden lines on the non-sectioned part of the drawings are not needed (figure 12) since they become redundant information and may clutter the drawing.

Sectioning Objects with Holes, Ribs, Etc.

The cross-section on the right of figure 22 is technically correct. However, the convention in a drawing is to show the view on the left as the preferred method for sectioning this type of object.
Figure 22 - Cross section

Dimensioning

The purpose of dimensioning is to provide a clear and complete description of an object. A complete set of dimensions will permit only one interpretation needed to construct the part. Dimensioning should follow these guidelines.
  1. Accuracy: correct values must be given.
  2. Clearness: dimensions must be placed in appropriate positions.
  3. Completeness: nothing must be left out, and nothing duplicated.
  4. Readability: the appropriate line quality must be used for legibility.

The Basics: Definitions and Dimensions

The dimension line is a thin line, broken in the middle to allow the placement of the dimension value, with arrowheads at each end (figure 23).
Figure 23 - Dimensioned Drawing

An arrowhead is approximately 3 mm long and 1 mm wide. That is, the length is roughly three times the width. An extension line extends a line on the object to the dimension line. The first dimension line should be approximately 12 mm (0.6 in) from the object. Extension lines begin 1.5 mm from the object and extend 3 mm from the last dimension line.
A leader is a thin line used to connect a dimension with a particular area (figure 24).
Figure 24 - Example drawing with a leader

A leader may also be used to indicate a note or comment about a specific area. When there is limited space, a heavy black dot may be substituted for the arrows, as in figure 23. Also in this drawing, two holes are identical, allowing the "2x" notation to be used and the dimension to point to only one of the circles.

Where To Put Dimensions

The dimensions should be placed on the face that describes the feature most clearly. Examples of appropriate and inappropriate placing of dimensions are shown in figure 25.
Figure 25 - Example of appropriate and inappropriate dimensioning

In order to get the feel of what dimensioning is all about, we can start with a simple rectangular block. With this simple object, only three dimensions are needed to describe it completely (figure 26). There is little choice on where to put its dimensions.
Figure 26 - Simple Object

We have to make some choices when we dimension a block with a notch or cutout (figure 27). It is usually best to dimension from a common line or surface. This can be called the datum line of surface. This eliminates the addition of measurement or machining inaccuracies that would come from "chain" or "series" dimensioning. Notice how the dimensions originate on the datum surfaces. We chose one datum surface in figure 27, and another in figure 28. As long as we are consistent, it makes no difference. (We are just showing the top view).
Figure 27 - Surface datum example

Figure 28 - Surface datum example

In figure 29 we have shown a hole that we have chosen to dimension on the left side of the object. The Ø stands for "diameter".
Figure 29 - Exampled of a dimensioned hole

When the left side of the block is "radiuses" as in figure 30, we break our rule that we should not duplicate dimensions. The total length is known because the radius of the curve on the left side is given. Then, for clarity, we add the overall length of 60 and we note that it is a reference (REF) dimension. This means that it is not really required.
Figure 30 - Example of a directly dimensioned hole

Somewhere on the paper, usually the bottom, there should be placed information on what measuring system is being used (e.g. inches and millimeters) and also the scale of the drawing.
Figure 31 - Example of a directly dimensioned hole

This drawing is symmetric about the horizontal centerline. Centerlines (chain-dotted) are used for symmetric objects, and also for the center of circles and holes. We can dimension directly to the centerline, as in figure 31. In some cases this method can be clearer than just dimensioning between surfaces.